DIY Friday: Build a backyard wind turbine
This may not be too useful if you live in a New York City loft, but if you have a large property in a windy location, try generating some eco-energy. Of course, you could buy one — but that wouldn’t be any fun. This tutorial was "generated" after an astronomer bought a remote property without electricity — but with lots of wind:
I started by Googling for information on home-built wind turbines. There are a lot of them out there in an amazing variety of designs and complexities. All of them had five things in common though:
- A generator
- Blades
- A mounting that keeps it turned into the wind
- A tower to get it up into the wind
- Batteries and an electronic control system
I reduced the project to just five little systems. If attacked one at a time, the project didn’t seem too terribly difficult.
Step one — find a generator: A popular option is to adapt an old computer tape drive motor — Amatek PM motors appear to be the best option.
Check out ebay to purchase. As for the required technical specs:
When used as generators, motors generally have to be driven far faster than their rated speed to produce anything near their rated voltage. So what you are looking for is a motor that is rated for high DC voltage, low rpms and high current. Steer away from low voltage and/or high rpm motors. You want a motor that will put out over 12 Volts at a fairly low rpm, and a useful level of current. So a motor rated for say 325 rpm at 30 Volts when used as a generator, could be expected to produce 12+ volts at some reasonably low rpm. On the other hand, a motor rated at 7200 rpm at 24 volts probably won’t produce 12+ volts as a generator until it is spinning many thousands of rpm, which is way too fast for a wind turbine. So shop for motors accordingly.
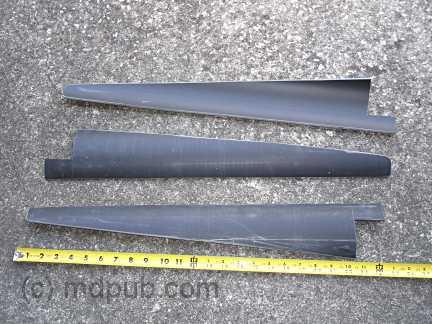
Step two — construct blades: Our astronomer DIY’er cut sections out of PVC pipe. He quartered a 24inch long, 6inch pipe (resulting in four blades — 3 for the turbine, with one spare), then shaped and sanded the blades.
Step three — connect the blades to a hub: Find a metal disc that can attach to the motor. Drill 6 holes on the perimeter (two for each blade). One option is to connect two discs together: one that will connect the blades, one that will connect to the motor (which is what our astronomer friend did).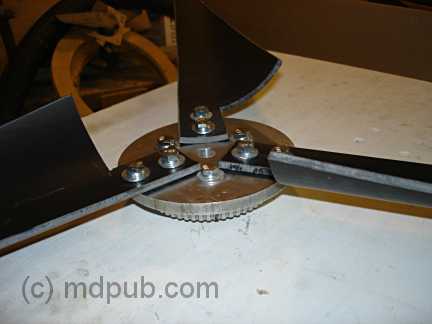
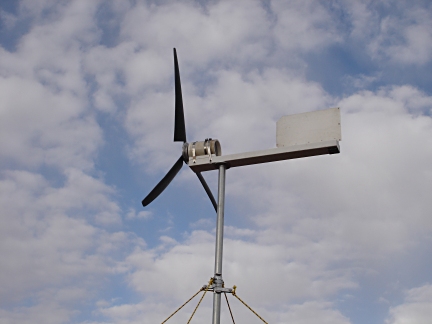
Step four — mount the turbine using wood or piping connect the motor/blade apparatus to a base. Notice in the picture a sheet-metal "tail" that keeps the turbine directed towards the wind. The turbine should be mounted on a sturdy pipe, secured by guy-lines. Ideally, the power cord will run through the piping to the ground.
Step five — connect the electronics:
A wind power system consists of the wind turbine, one or more batteries to store power produced by the turbine, a blocking diode to prevent power from the batteries being wasted spinning the motor/generator, a secondary load to dump power from the turbine into when the batteries are fully charged, and a charge controller to run everything.
A lot of controllers are available on ebay or you can build your own (instructions are available here).
Need more details or want to build a larger, more elaborate design? Considering buying detailed plans here.
And if your own website isn’t "renewable" enough, you can always get "Web Hosting As Nature Intended". This company uses solar panels to power their servers (check out a webcam here). We’ll have to look into it here at ReallyRocketScience.