Posts Tagged ‘diy friday’

DIY Friday: Backyard Flying Saucer

Friday, January 16th, 2015

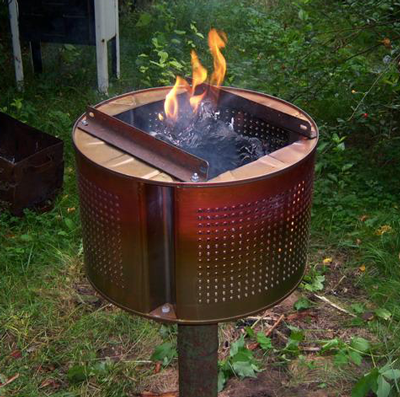
We like upcycling. When it includes old satellite dishes, we love it!

Using a couple of old C-band mesh antennas to make an alien spacecraft in your backyard is brilliant and worth sharing.

The idea for this project had been milling around in my brain for awhile… I had visualized taking two satellite dishes, preferably 2 of the fiberglass type and slap them together like 2 pie plates to form a traditional saucer shape. The first task I had was to find suitable dishes to salvage for the project. I drove around whenever I had time to watch out for candidates, and I watched Craigslist and other sources of ads on the Internet. I live just outside the city limits, and had plenty of countryside to travel around. I also kept my mind open to the possibility of using the metal mesh dishes as well, thereby doubling my chances of finding what I needed.

Eventually, I placed an ad on Craigslist asking for a dish, and voila! I got a bite! It turned out to be a mesh dish in the city but just a few minutes away. I went over on a Sunday afternoon and it took an hour and some elbow grease to dismantle the dish and load it into the back of my pickup. I should mention that even if I couldn’t use the mesh dish, I could always take it to the recycling center and get some cash out of it! Ironically, I found a fiberglass dish about a mile from home, and after a couple of tries, I finally met the home owner, who said his wife had been asking and asking and asking him to remove the dish. Sounded like I arrived just in time! This one took about TWO hours to take off the mount and take it down to 2 halves and strap them down to my utility trailer. Note: It helps if you have some assistance to dismantle these things, they are HEAVY as all get out! After bringing them home and laying them out in the back yard, I pondered what to do about the situation, as time was marching on and I was tired of looking for dishes.

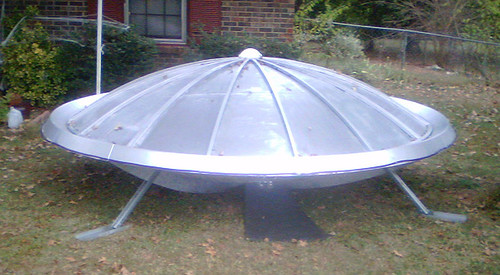
Get out there and make your own!


DIY Friday: KickSat Deployment

Friday, May 9th, 2014

KickSat follow-up:

Regular updates as well as more background information are available on the project’s Kickstarter page. As an open source project, all of our code and design files are freely available. The primary source for technical information on the KickSat project is the project wiki. Academic publications are listed on our research group’s website.


DIY Friday: Frankenstein Bulbs

Friday, October 25th, 2013

Via Instructables

Step 1.) Remove The Tab on the light Bulb
Step 2.) Break the insulation layer (black part)
Step 3.) Break the fialament and pulling it out
Step 4.) Add Water to wash it out if white (if clear skip step)
Step 5.) Add Gel i ended up using a different gel i used a garage door lubricate instead of the hand sanitizer
Step 6.) Add Padding to bottom of box
Step 7.) Make an outline of the cut your about to do to fit the light bulbs in
Step 8.) Cut out the holes made with 7/8 bit
Step 9.) Wire the leds two both battery terminals and the switch Refer To This Diagram ——–> http://www.youtube.com/watch?v=owgrUYC0Sfw&feature=youtu.be
Step 10.) Glue together and Turn On And Enjoy


DIY Friday: Spacesuit

Friday, August 16th, 2013

Cameron Smith is making his own spacesuit. Although this is not for everybody, we think it’s very cool just the same. Wired did a piece on this a year ago…

Taking a balloon up into the lower stratosphere may seem crazy, but to Cameron M. Smith it’s an opportunity to fulfill a lifelong dream. The 45-year-old Portland State University anthropologist couldn’t join NASA’s aviation program because of his poor eyesight. Lacking the funds to buy a ticket on a private space flight, he decided to take matters into his own hands.

At 50,000 feet up, death is imminent, so the first thing to do was build a suit. Smith bought some of the parts off the Internet: a diver’s dry suit, a gauge that measures internal air pressure, and an aquarium pump to circulate cooling fluid. Ace Hardware had other bits like nylon straps, wire, and a slew of PVC fittings and valves. It’s topped off with an authentic 1980s-era soviet fighter helmet.

Once the proof-of-concept suit is complete, Smith will test his rig in a hypobaric chamber, and if all goes well it will be rebuilt with sturdier elements. Then he’ll craft a nylon balloon, get a balloon pilot’s license, and clear his route with authorities. “If they could do this in the 1930s with rubberized canvas and pigskin gloves, surely I can do it now with the technology available,” Smith says. “This is not so crazy. This is not so wild.” Sure. We’ll just stay on the ground and watch from here, thanks.

So what does he plan to do with this? Make one for Copenhagen Suborbitals, which describes itself as…

This is a non-profit suborbital space endeavour founded and led by Kristian von Bengtson and Peter Madsen, based entirely on sponsors, private donators and part time specialists. Since May 2008 we have been working full time to reach our goal of launching ourselves into space and to show the world that human space flight is possible without major government budgets and administration.

Kristian von Bengtson blogged it recently

In just a few days DIY space suit guys Cameron Smith and John Haslett will visit us in Copenhagen for a 10-day session of suit presentation, seating design and space suit testing.

We are all very excited and I am trying to get prepared for this special event. Even though we joined forces half a year ago – meeting in person like this is going to be very special and will mark a special celebration of a US/Danish joint venture space adventure!

This is one of the most interesting DIY projects we’ve ever seen.


DIY Friday: Washing Machine BBQ

Friday, August 9th, 2013

You don’t need to understand Russian to figure out what’s going on here.

It’s an old washing machine drum, a steel pipe, angle iron and some bolts, plus concrete. Mash them up and you’ve got a great BBQ contraption. Probably works as well as a Weber kettle, but much cheaper. Looks like good airflow, too.

Next trip to the county solid waste disposal station will find me looking for an old washing machine. Excellent recycling idea!

bbq_wash


DIY Friday: Old Dish Fire Pit

Friday, July 26th, 2013

Not exactly a genius project, but it’s another good use of an old reflector. Use the old dish as a backyard fire pit.

All because he tripped over it in the garage. Via Instructables

We had a large dinner party / BBQ in our back yard a couple of years ago at the beginning of the summer. As the sun sat the girls at the party started getting cold. All I had on hand was a few #10 cans that we punched holes in, filled with charcoal and lit. Imagine 5-10 girls trying to crowd a small can of coals for heat. So I went in search of a Fire-pit / Brazier for my next party. I couldn’t find one anywhere. I looked for one of the round kettle style charcoal BBQ grills to convert but couldn’t find one of those either. When I returned home discouraged I tripped over an old Satellite dish laying around my garage. It gave me an idea. With no more than $10 spent this is what you get. Cheap and effective and kind of cool. IF you wish you could add a lid or use tighter mesh to reduce sparks and up your cool factor.

Most folks who live in wide open space probably have real fire pits. If you have a smaller backyard or live in the suburbs, you’ll want to use a fire pit like this so you could put a lid on it and crash for the night and not worry about getting a FAIL tag for burning down the neighborhood. Please: never use gasoline to get the fire going.


DIY Friday: MakerPlace in San Diego

Friday, April 27th, 2012

Great idea: convert an old warehouse into a members-only facility for inventors, tinkerers, craftspeople and DIYers. Offer classes and workshops, too. It’s called MakerPlace and it’s pretty cool.

Looking at their equipment list — and the number of rocket scientists living in and around “America’s Finest City” — it should prove to be a successful endeavor. You can get it done here:

4 axis CNC mill
manual mill
metal lathe
pipe notcher
brake (16 gauge)
planishing hammer
English wheel
TIG welder
gas welder
MIG welder
shear (16 gauge)
metal belt sander
horizontal band saw
metal and wood bandsaw
permitted paint booth
wood belt sander
3D printer (abs plastic)
Corner Notcher
Shrinker/ Stretcher
35 Ton Press Brake
Grinder/ Polisher
metal and wood drill presses
shaper
Saw Stop table saw
15″ planer
miter saw
panel saw
cnc router with vacuum table
assorted hand tools
integral sawdust management
VIC Engrave
Corel Software Suite
EagleCAD, Rhino
Fritzing, Alibre
Mach3, V CArve Pro
Cut 3D, SketchUp
Buzz 2 Stitches
Arduino, PCB 123
large format laser cutters
laser engravers
oscilloscopes
function generator
variable power supplies
multi-meters
soldering irons
large format vinyl cutter
industrial sewing machine
6 needle embroidery machine
large format inkjet printer
CNC router
sand blasting cabinet
free wireless internet service
conference room w/projector
4 color silk screen and dryer

Check out their photos.

Stay classy, San Diego!


DIY Friday: Imaging From Above

Friday, February 24th, 2012

Pretty cool little project via MAKE Magazine (vol. 24, page 80): a helium balloon “satellite” camera platform.

The first time I saw a satellite photo of my house on Google Earth, I expressed shock at the “Big Brother” implications of an all-seeing, commercial eye-in-the-sky. But meanwhile, I was also secretly disappointed with the picture quality and clarity because (Orwellian angst aside) I needed better overhead images for my own use — to help me lay out a new driveway and complete a birds-eye-view CAD drawing of our lot. So I decided to design and fabricate a simple helium balloon “satellite” camera platform, tethered to the ground for ease of control and retrieval, and dedicated to a single purpose: to capture aerial images of my house and surroundings.

Here’s how I completed this project using inexpensive and readily available components — helium balloons on a nylon kite string, a drugstore camera perched on a platform made out of an old CD, and a PICAXE microcontroller housed in an empty pill bottle.

Seems simple enough. Not as dramatic as the $150 MIT project that yielded near-space photos, but it’ll do.

DIY Friday: Your 100-MPG Microcar!

Friday, October 26th, 2007

Longtime readers of Really Rocket Science know we’re huge fans of the X-Prize, and we’ve been especially intrigued by the potential of an automotive X-Prize, whose objective is to promote the design of "viable, clean and super-efficient cars that people want to buy."

But what about design viable, clean and super-efficient cars that people want to DIY?


Jory Squibb of Camden, Maine put together Moonbeam (both pictured above), "a three-wheeled microcar that he built with $2,500 in parts and 1,000 hours of his labor, product of a mechanical engineering degree at Yale and a childhood growing up in Detroit as son of a General Motors man," according to the Nashua Telegraph:

Squibb says Moonbeam gets 85 mpg in the city and 105 mpg on the open road (it’s not fast enough for the interstate), despite the lack of a high-tech power plant.

It’s powered by an ordinary four-stroke, water-cooled engine, taken from a 150CC Honda motorscooter. He attributes the mileage largely to minimalism: Moonbeam only weighs 400 pounds, barely more than a decked-out Hummer’s hubcaps.

Squibb… knows Americans won’t abandon their F-150s for something that looks like a gunner’s ball turret from a World War II bomber. He regards Moonbeam as inspiration for other tinkerers, and perhaps a bit of comic relief in the important job of remaking our transportation system….

[A]s Squibb acknowledges, it will be just about impossible to give up oil, he thinks technology can greatly cut our use of it.

That’s why he has also joined the hunt for the Automotive X Prize.

This is an Earthbound version of the $10 million contest that prodded the first private spaceflight in 2004. (The X Prize Foundation also has a $10 million genomics contest for the first team to sequence 100 human genomes in 10 days.)

Details are still being worked out, but the idea is that a big-bucks Automotive X Prize will spur invention of a super-efficient, super-clean and super-marketable car – no concept vehicles, please.

Squibb is psyched, and he’s also psyched by signs the major companies are getting seriously involved in electric and alternative-fuel vehicles.

Luckily for us DIY fanatics, Squibb has his own website in which he describes how an average Joe (or Joette) can build their very own Moonbeam, and explains the reasoning behind some of his decisions in the design of the car — including the question of why three wheels instead of four, which we found rather edifying:

We pioneers and prototype makers are, to some degree, trapped with three wheels.   We want to go beyond two wheels for reasons of stability, enclosure, year-round use, and user friendliness.  Yet we are blocked from four wheels by the large amount of safety regulations of such cars.   And yet, for a prototype to be tested, seen, and thereby enter vehicle evolution, it needs to roll on the roads, and therefore be licensed, insured, and inspected.  A four wheel car will need dual brake systems, safety glass windows, air bags, impact bumpers, etc.

These requirements are based on safety, which is good.  It’s not that we are sleazes who want to build death-traps!   Rather, we need a little slack to try something new, something which in eventual production will have more safety refinements.  Building three wheelers,  which are classified as motorcycles, we have that breathing space.

There are also links to some cool videos of the Moonbeam in action, er, motion: 

Squibb and about 20 of his fellow visionaries from Down East have formed a team to compete in the Automotive X-Prize — but Moonbeam is not among them. Still, for $2,500 and 1,000 hours of labor, you can be cruising on in your very own Moonbeam by this spring. And with oil at $91 a barrel and rising, you can recoup that cost quickly!