Solar Filter
Wednesday, July 29th, 2009
Great shot by Thierry Legault, using special solar filters, of the ISS and shuttle, silhouetted against the Sun. Via OnOrbit
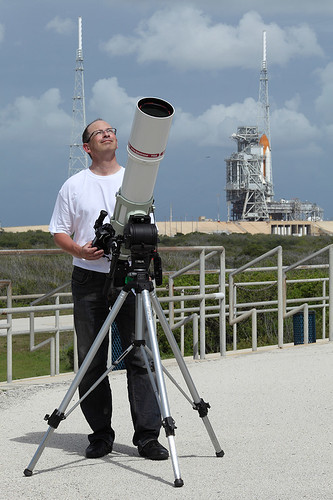
Great shot by Thierry Legault, using special solar filters, of the ISS and shuttle, silhouetted against the Sun. Via OnOrbit
So this may not be related to rocket science, but it is an awesome little project. Awesome. A head-mounted water cannon, courtesy of Make and John Young:
Let’s face it: At some point this summer, you’re going to be in a water fight. Whether it’s at a family barbecue or an office picnic, some 12-year-old is going to leer at you from behind 25 bucks worth of store-bought plastic, and that little punk is going to think that the orange and blue Mega Awesome Hydrolator 9000 they’re clutching is the last word, the ultima ration regnum, in neighborhood water warfare.
Think again, punk. With about two hours of effort and the parts listed on the next page, you can hack together a water weapon of such power, such style, such extraordinary and exuberant overkill, that you’ll be out of the store-bought leagues forever. Lock yourself in the garage, play the A-Team theme, and emerge at the end of your build montage with a pressurized, stainless steel, head-mounted water cannon that packs five gallons of icy-cold water at 100 psi.
This video has it all:
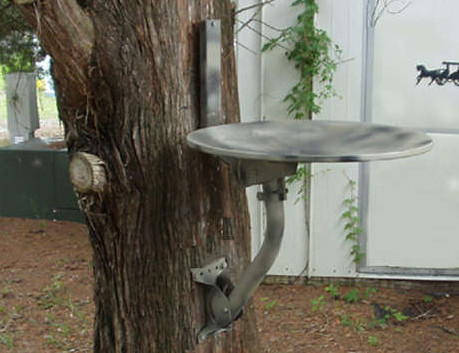
Here’s a simple project I might try with my old reflector and mount: a bird thing. Via Instructables:
Have you ever wondered how many unused satellite dishes are floating around aimlessly out there? After being disconnected, they seem to have no apparent function other than occupying valuable storage space and being mostly ugly? The object of this exercise is to offer a simple way to make an environmentally friendly use of one of the thousands of satellite dishes that have found their way into the landfills, attics and garages of those who have had their service disconnected.
The satellite companies typically require the user to return the receiver but to leave the dish and its hardware behind. For those who have access to the removal of this unsightly hardware, here is a garden friendly way to put it to use as a free, rugged, and weather resistant birdbath. Keep in mind that if you plan to install it on a tree you will have to fiddle around a bit to find a level spot to secure it and you may even need to use wooden blocks or shims in extreme cases. The idea is to keep it reasonably level to allow water to seek its own level in a more or less uniform way.
We’ve had many projects for old dishes on this blog (wifi, cantenna, gazebo, solar cooker), but I like this one for its simplicity and subtle geek appeal.
This Satellite Dish is for the Birds – More DIY How To Projects
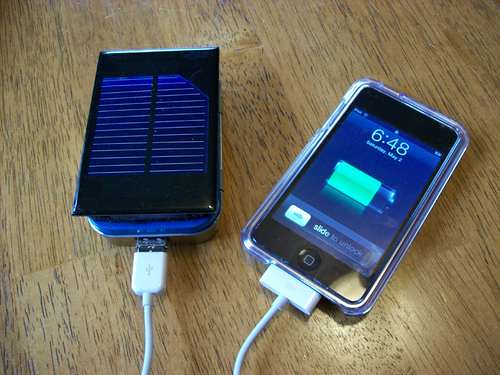
You’re out there having fun, in the warn California sun. Pfft! Your iPhone or iPod runs out of juice — and you’re not having fun any more.
What do you do? Enjoy the silence? You might, yes. Pull out your solar-powered MintyBoost!
There are some really nice features about this charger:
- It’s solar powered!
- It’s small.
- Large battery capacity- 3.7v @2000mAh
- On board charger charges via solar, USB or wall wart. Accepts input power from 3.7v to 7v.
- Remove the solar cell after charging and you have a nice compact USB power supply.
- Unplug the solar cell and use the Velcro to secure the MightyMintyBoost inside a backpack or messenger bag- now plug in a larger solar cell attached to your bag for even faster charging. Using a slightly larger solar cell (6v/250mAh) you can generate enough power to fully charge an iPhone in about 5.5 hours and an iPod Touch in 4 hours.
How to make a solar iPod/iPhone charger -aka MightyMintyBoost – More cool how to projects
Whoa, inside one of the Blue Angels jets. Enjoy.

Fantastic entry in the Instructables "Get The LED Out" contest: How To Communicate With An Alien Artifact or . . .Close Encounters of the Curiously Minty Kind.
Most LEDs are VERY bright over a very small viewing angle. Here I’ve used wide-angle flat top LEDs which give the same light but spread over a much wider range which will allow this to be appreciated from all angles. The video really doesn’t do justice to the brightness and clarity of the LEDs. They are bright even in daylight. Also the initial flashing is an artifact. The LEDs are pulsing smoothly.
The 12 LEDs are arranged as three banks of 4, which gives 7 possible patterns of illumination. It would have been good to have more but I wanted to keep this simple and specifically use the PicAxe 08m chip. The spreadsheet shows the way the LED colours and banks are arranged.
For the LED array you will need :-
* 3 x red LEDs, 3 x blue LEDs, 3 x green LEDs, 3 x yellow LEDs.
* 6 x 180R resistors (brown, grey, brown) for the red and yellow LEDs.
* 3 x 220R resistors (red, red, brown) for the blue LEDs.
* 3 x 330R resistors (orange, orange, brown) for the green LEDs.
* 18 x 15 hole copper strip veroboard.
* Spot face cutter ( or a 5mm drill bit or craft knife).
* Scraps of plain board and link wire.

Love the video clip…
Since we’re using less and less paper, who needs binder clips? Use your surplus to make a dock for your iPhone/iPod.
Sit back and watch…
A friend of mine, a physics teacher in Northern New Jersey, had all the kids at a summer party do a rocket craft: a water bottle rocket. Most of the kids were younger and didn’t quite get the physics behind it. Little did I know it’s part of his curriculum. And he’s good at it, too. In fact, he was featured on PBS in their piece on the Liberty Science Center’s Summer Physics Teachers Institute:
It was such a cool project, I plan to replicate for my son’s birthday party (we had snakes and lizards one year, so we’ve got to better that one). Having done it before, I know we’ll get the "wow" reaction from the kids — mostly boys — that we’re after. Of course, Instructables.com has a really cool example, with a list of simple materials:

> 2 Soda Bottles (empty)
– Note: There are slight differences in the openings of the bottle depending on the soda brand. Pepsi is just a tad smaller than Coke. –> 1 sharp knife (kids get your parents help here!) I prefer X-acto brand for cutting foam core.
> 1 Large sheet of Foam Core (I prefer Black, but any color will do).
> 5 Min Epoxy (This stuff is nasty! Do not inhale, and use in a well ventilated area. Do NOT get it on your skin or eyes, or hair, etc… read all safety warnings before using.) Feel free to experiment with other glues.
> 2 (or more) Markers – I used Sharpies, one black and one Silver
> Clear Shipping Tape – It’s thicker than regular scotch tape and about 2" wide.
> 2 (or more) cans of spray paint – Pick your own favorite colors!
Finkbuilt’s Water Rocket Party has lots of great ideas (I think I might use some for my party). Of course, Make magazine’s Issue 05 has a great piece on water rockets.
We’ll follow up with party pictures in a couple of weeks.
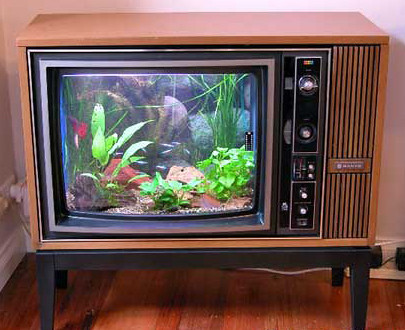
On trash days, there seem to be lots of old TVs at the curb. Then, on cardboard recycling days, plenty of boxes from big LCD and Plasma TVs. Kind of makes sense to me.
Hey, instead of just throwing them out, think about recycling/repurposing them. Take, for instance, this working fish tank inside an old floor model…
Here’s a "top ten ways to recycle an old TV," courtesy of TopTenReviews.com:
1. Recycle- Televisions can contain lead, mercury, cadmium and other dangerous materials and if disposed of improperly these materials will leak into the soil. This may seem like an obvious option but many people don’t even know that television recycling exists. Even if you decide to keep the TV and just remove its guts look for a proper way to recycle the insides. Most major retailers and manufactures are working to increase television recycling awareness. Go to Earth 911 or Plug-in to eCycling for recycling locations and more information.
2. Donate- Schools especially could use the extra TV love. Most schools have televisions in class rooms on closed circuits or use them to show movies and National Geographic specials. Old TVs will still work with DVD players and VCRs.
3. Give it to the Kids- How many times can you stand to watch Disney DVDs? Put the old set in the kids’ room and let them watch their favorite DVDs and you can have a few moments of peace and quiet.
4. Make an Aquarium- You know you’ve always wanted to make your television into a fish tank. Now is your chance.
5. Use it as an End Table- Those with really old sets that have large wooden enclosures know exactly what this means.
6. Make Art- If people made toilets into art, who’s to say that an old television set can’t be made into art? Use your imagination people.
7. Build a Coffee Table- Turn your television on its back, stabilize, place a piece of glass over top and voila´ you have a coffee table. Hey, you could even hook up a DVD player and have movies play or picture slide shows.
8. Build a Tesla Coil- Take extreme caution if attempting this task. As a matter of fact, forget we ever suggested building a Tesla Coil. They are dangerous and this should only be attempted by professionals.
9. Build a Video Game Machine- For those that like to combine construction and technology you can build an old arcade type console and hook up an old Nintendo or Sega. Pac-Man rules!
10. Make a Planter- Yeah, that’s right, carefully gut the television and make a fun flower planter.
Personally, I like HackedGadgets.com’s Top 5, such as this wave vessel:
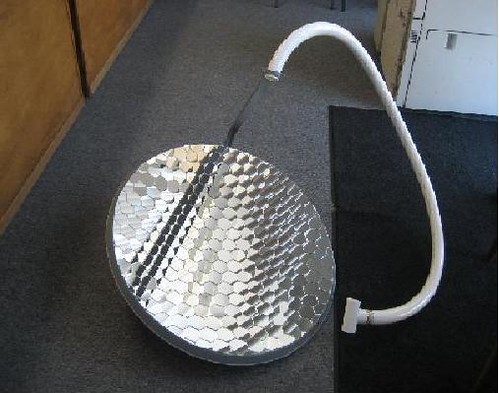
Most folks call it a "satellite dish." Engineers call it an antenna, consisting of a mount, feedhorn and reflector. The reflector concentrates radio frequency signals from an orbiting spacecraft to give you TV or a two-way data connection. We’ve blogged about people using old "dishes" as solar reflectors, mostly for fun or cooking out in the field.
Somebody is now taking that concept seriously — and adding true satellite TV reception. One of the finalists at last year’s Clean Tech Open, the Transoptic Solar Water Heater has arrived, getting the attention of Fast Company, via Green Tech Media:
Want your satellite TV dish to pull a double-duty? You can turn it into a solar-thermal device to heat water and cool your home.
That’s the pitch from Transoptic, which would place a layer of little hexagonal mirrors resembling a honeycomb or a chrome-coated plastic reflector onto the dish, said Behzad Imani, CEO of the San Mateo, Calif., company. The entire system comes with an optical receiver, PVC tube and an evacuated tube (see a YouTube video that shows how you can build one yourself).
The company wouldn’t retrofit an existing dish but instead provide a new one that can receive TV signals and concentrate the sunlight and direct it to an optical collector for heating the water, Imani said.
A 2-square-meter dish could generate roughly 82 Therms of energy per year, the company said. A standard water heater requires about 58 Therms per year. Each dish would cost about $300, and installation would cost roughly $300 to $400, Imani said.
Transoptic doesn’t want to be in the business of selling the system directly to consumers and installing them. Instead, it wants to sell to home developers, roofers and distributors.
Imani said he has lined up a track home builder as a customer but declined to disclose the name. To fulfill the order, however, it would need to raise $250,000 initially to get started on manufacturing, he said. Imani said he would be looking for a larger amount if the credit crunch hasn’t made fund-raising so difficult. The idea is to begin a small-scale production and then use the revenues to expand manufacturing.
When it comes to harnessing the power of the sum, solar water and pool heaters far outnumbers solar panels in the United States. Solar heaters are cheaper and you also could get rebates and claim tax incentives for installing them.
Great idea. Hope they get financing soon.